


Prototypes take many forms, from simple paper sketches and mock up’s, through to fully detailed CAD models and fully finished electromechanical models with complete functionality and representative finishes. As part of our comprehensive product prototyping service, we help clients translate ideas into physical products for testing, demonstration, and refinement.
As part of an integrated design process Optima can provide physical product prototypes to validate both function and form. These are often crucial in a full product prototyping and development. The benefits of CAD driven rapid product prototyping and testing techniques are numerous. Some of which include reduced development time, safer, leaner and more visually sophisticated final products; functional prototypes for testing; convincing appearance prototypes; and prototypes that can be used for promotional activity and marketing.
Optima have established relationships with several key suppliers in the UK and Far-East, ensuring the lowest cost and the most appropriate product prototyping methods.
Our product prototyping service incorporates a wide range of technologies and processes, including:
SLA (Stereolithography) prototyping is a 3D printing process that uses a laser to cure liquid resin, layer by layer to create a solid object. The laser traces patterns based on a 3D CAD design, hardening the resin where it focuses. After each layer is completed, the platform moves slightly to allow the next layer to be formed. This this process repeats until the whole object is resolved.
The models can subsequently be refined to achieve a high-precision, smooth surface finish, making them ideal for detailed prototypes and presentation models. A variety of resins are available, each designed to replicate the characteristics of common engineering plastics. This enables the creation and testing of prototypes that accurately simulate fit and function. The advantages of this process are numerous, including the assessment of assembly conditions, a reduction in time to final tooling, ergonomic evaluations, and pre-tooling testing and certification — all key elements of a successful product prototyping service.
CNC (Computer Numerical Control) machining is a process in which a computer-controlled machine carves a part from a solid block of material, such as metal, plastic, or wood. The design is uploaded into the CNC machine, which then precisely follows the provided data to shape the part by removing material layer by layer using tools such as drills, mills, or lathes. While similar to traditional machining, CNC machining distinguishes itself by being digitally controlled with multi-axis capabilities, allowing for the creation of highly complex parts that would be difficult to produce using traditional techniques.
This method is great for creating robust, accurate prototypes, especially when the final parts need to be made from durable materials. It’s often used for low-volume production or when high precision is required, such as in mechanical or functional parts for testing. It is also commonly used to make master moulds for soft tooling and PU moulding.
DLP (Digital Light Processing) prototyping is a 3D printing method where a screen shines light onto a liquid resin, curing it layer by layer to create a solid object. A base screen displays an image of each layer, and the emitted light hardens resin in the areas it exposes. After each layer is cured, the build plate moves slightly to make room for the next layer. This process repeats until the object is fully resolved.
DLP is known for its speed and high precision, making it ideal for creating detailed prototypes with smooth surfaces. It’s commonly used for making models in industries like jewellery, dental, and product design engineering.
SLS (Selective Laser Sintering) is a 3D printing process that uses a laser to heat and fuse fine particles of powdered material, like Nylon, Polypropylene and Aluminium, layer by layer. The laser selectively melts the powder based on a supplied 3D CAD design, bonding the particles together. After each layer is completed, the platform drops slightly, and new powder is spread over the surface. This process continues until the object is fully built.
SLS is highly effective for producing strong, functional prototypes due to its use of materials that closely replicate those used in final products. The process does not require support structures, as the powder itself supports the object during printing, resulting in a quicker and more accurate development of functional parts.
Vacuum casting is a prototyping process in which a master model (typically a 3D-printed resin or CNC-machined form) is used to create a mould cavity. Initially, a silicone mould is formed around the master model. The mould is then placed in a vacuum chamber, where a two-part liquid resin is injected into the cavity, setting to form the part. The vacuum chamber helps eliminate any remaining air pockets and bubbles, ensuring the production of consistent parts. Once the material has set, the mould is removed, yielding a high-quality replica of the original model. The mould can be reused multiple times to produce additional identical parts.
This process is commonly employed for producing small batches of parts or prototypes with a smooth finish and exceptional detail. It is particularly useful for creating parts that closely resemble the look and feel of injection-moulded products. The resins used are specifically formulated to mimic common engineering plastics, including Acrylic, Glass-filled Nylon, Polycarbonate, and ABS.
Thermojet wax model prototyping is a process where a 3D printer creates a model using a wax-like material that can be melted away. First a 3D printer builds the object layer by layer. Once the model is complete, it can be used as a sacrificial master part in the casting processes, like lost-wax casting. The part is used to form a cavity, this is then filled with a hot liquid material such as steel or aluminium, which melts and displaces the wax master, leaving behind a part formed in the intended material.
This method is commonly used in industries like jewellery, aerospace, and automotive to create highly detailed, accurate prototypes or final parts that are required to be made in limited volumes.
RIM (Reaction Injection Moulding) prototyping is a process where two liquid materials are mixed and injected into a mould. These materials react with each other and chemically cure to form a solid part. The mould is usually made of metal or a durable material, and after the liquid mix is injected, it hardens into the final shape.
RIM is often used for making large, lightweight parts with complex shapes, and it works well with materials like polyurethanes. It’s commonly used for prototype parts in industries like automotive or consumer goods, where a functional part is needed quickly and without the cost of traditional injection moulding.
By employing one or more product prototyping techniques, a physical representation of the final product can be created prior to mass production. This process can serve various purposes, such as generating marketing materials, testing the product, or proving the concept, depending on the specific requirements.
Once the parts are fabricated, they are smoothed and refined as needed. Additionally, details such as textures, paints, and decals can be applied to enhance the model’s resemblance to the final product.
Ultimately, the goal is to transform a concept into a tangible object that closely mirrors the final product, enabling necessary improvements before full-scale production.
Prototype tooling refers to the creation of moulds or tools used to produce small batches of products during the prototyping phase. These tools are typically made from softer, less expensive materials (like aluminium, resin, or silicone) instead of harder materials like steel. The purpose is to create prototypes more economically, allowing designers to test and refine the product before committing to expensive mass production tooling.
Since the materials used for prototype tooling are easier to work with, the process is quicker and more cost-effective — making it ideal for small runs or testing as part of a complete product prototyping service. This approach is often used when a company needs to produce a limited number of parts to assess design, fit, and function without the high costs associated with traditional steel tooling used for mass production.
In short, prototype tooling uses softer, more affordable materials to create small quantities of products quickly and cost-effectively for testing and refinement before full-scale production.
A “rig” is a custom made tool or system designed to assist in the construction, testing, or simulation of a product’s functionality. It is commonly employed to ensure the correct operation of a product before mass production begins.
For instance, when designing a new car, a rig might be developed to test how the suspension system responds to various stresses or to evaluate the functionality of the doors. The rig would simulate real-world conditions, allowing engineers to make necessary adjustments based on the results of these tests.
In a manufacturing environment, a rig may serve as a custom setup for assembling product components in a controlled, repeatable manner. This ensures proper alignment and fit of each part, thereby facilitating a smooth and efficient manufacturing process.
In summary, rig building in product design and manufacturing involves the creation of specialized systems or devices to test, assemble, or simulate product components, ensuring that the final product functions as intended prior to full-scale production.
Please contact us to discuss your product prototyping requirements and how the most appropriate rapid product prototyping technology can be integrated into your product design regime.
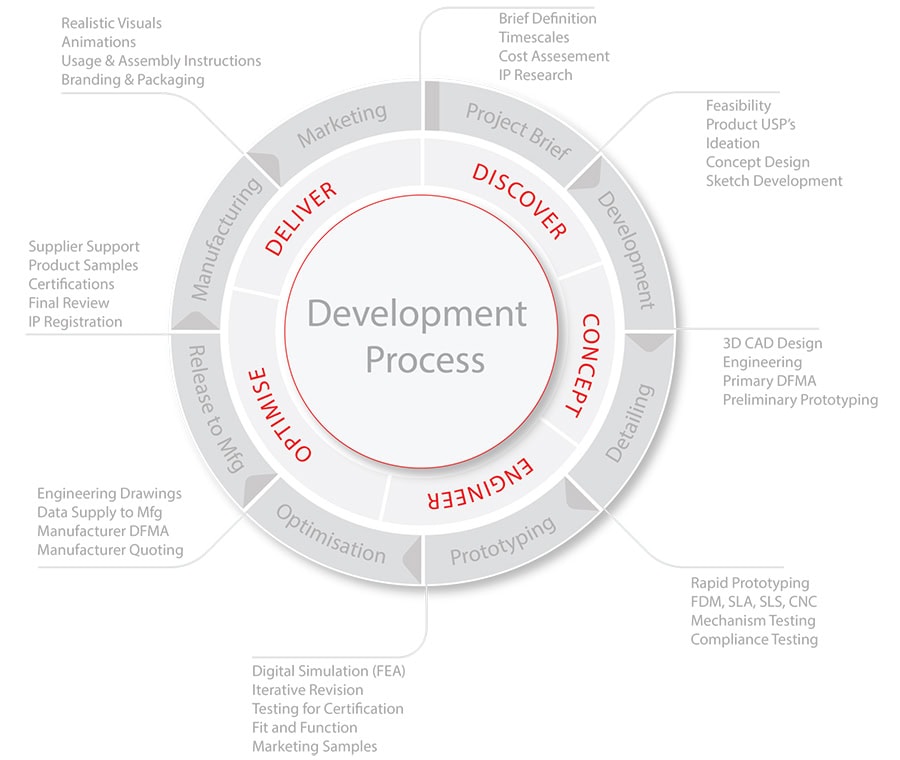
Prototyping is a key stage in our wider product development journey — explore our full development process to learn more.
Almost, always, yes.
Prototyping takes many forms, from simple sketches or foam models to fully functioning electromechanical designs. It is one of the most valuable tools for evaluating and refining a concept. Throughout the development process, we recommend various prototyping techniques and collaborate with specialist suppliers in the UK and the Far East to achieve the best balance of accuracy, cost, and timescale.
Prototyping is crucial in industrial design for several reasons. It helps validate design ideas by allowing real-world testing, identifying flaws early. It also ensures the product meets user needs by assessing ergonomics, usability, and comfort. Prototypes allow testing of materials, manufacturing methods, and performance, making it easier to refine designs through iteration.
A prototype provides a tangible way to visualise the product, ensuring it meets expectations for form, size, and aesthetics. It also facilitates communication with stakeholders, offering a physical model for feedback. Additionally, prototypes reduce the risk of costly mistakes by identifying issues before full production, saving both time and money. Ultimately, prototyping is essential for creating functional, user-friendly, and successful products.
No, we can work from verbal or written descriptions, or more detailed drawings of a design concept. We always propose a kick-off telephone call, screen share or in person meeting so we can gather as much information as possible about a product proposal, background to the idea, and long term goals. We also offer full ground-up development services and can formulate inventive concept solutions to an existing design problem, which has been identified. We can reccommend the most appropriate prototyping methods through the development process, from simple development sketches to fully functional electomechanical designs, which can be tested and certified in real-word trials.
We have expertise in CAD development which we supply to trusted prototype houses to produce accuate 3 dimensional parts. We also oprate in-house FDM (Fuse Depostion) 3D printing and small format DLP (Digital Light Projection) to enable quick turnaround development prototypes, often the same day.
Prototyping timelines in industrial design are heavily influenced by the product’s technical complexity and the type of prototype required. Low-fidelity prototypes, such as sketches, models, or basic mock-ups, are quick to produce and are primarily used to explore concepts and overall form. In contrast, high-fidelity prototypes, such as fully functional or detailed presentation models, require more time due to the need for precise engineering, material selection, and integration of aesthetic finishes.
The complexity of the product also impacts the timeline. Prototypes involving advanced materials, intricate mechanisms, or integrated electronics take longer to develop. Early-stage prototypes, like proof of concepts or simple form studies, can be completed relatively quickly, while more refined prototypes, such as functional or user-testing models, require more time for accuracy and detailed finishing.
As an example:
In general, more complex prototypes require more time, and a clear project scope helps set realistic deadlines. Prototyping can often run concurrently with other development activities to shorten timescales and optimize resource use effectively.
Product design prototypes can be tested in several ways depending on their intended use, complexity, and stage of development. Here are some common methods:
Purpose: To evaluate how users interact with the product.
Process: Users perform tasks with the prototype, identifying usability issues or frustrations.
Example: Observing users as they navigate controls or assemble a product to ensure that it is intuitive.
Purpose: To ensure that all functional components perform correctly.
Process: Engineers check that parts like buttons, switches, or moving elements work as intended.
Example: Testing a mechanical product to ensure parts don’t jam or wear prematurely.
Purpose: To compare different versions of the design to determine which performs best.
Process: Variations of the prototype are tested with users or in controlled environments.
Example: Comparing two handle designs for a kitchen tool to see which one is more ergonomic.
Purpose: To assess user comfort and ease of interaction.
Process: Users provide feedback on how comfortable and easy the prototype is to use.
Example: Testing the grip of a power tool prototype to ensure comfort during prolonged use.
Purpose: To evaluate the durability and performance of materials used in the prototype.
Process: Prototypes undergo stress tests, environmental exposure, and wear tests.
Example: Testing a plastic casing for its resistance to high temperatures or impacts.
Purpose: To ensure that the product can withstand real-world environmental conditions.
Process: The prototype is exposed to various conditions like heat, cold, moisture, dust, or UV light to simulate long-term use.
Methods: Temperature chambers, humidity chambers, and accelerated life testing.
Example: Testing an outdoor smartwatch prototype for water resistance and performance in high temperatures or rain.
Purpose: To ensure the product meets industry standards and regulations.
Process: The prototype is tested to verify it adheres to specific safety, environmental, or manufacturing standards.
Methods: Standardized tests based on industry certifications (e.g., ISO, CE, UL).
Example: Testing an electronic product prototype for electrical safety and certification compliance.
By utilising these methods, designers can refine their prototypes, ensuring that they meet user needs, perform reliably, and are ready for the next development phase.
The cost of prototypes in product design varies depending on factors like complexity, materials, and production methods.
Low-fidelity prototypes are simple models used early in the design process to visualise concepts. These can include sketches or basic 3D-printed mock-ups, often produced quickly and inexpensively.
Medium-fidelity prototypes are more refined, using better materials and some functionality. They may involve 3D printing or basic mechanical components to simulate the final design, typically used for user testing or feedback.
High-fidelity prototypes closely resemble the final product in terms of materials, appearance, and function. These prototypes often include detailed finishes and working components, made through processes like CNC machining, vacuum casting or injection molding.
Functional prototypes are fully operational models intended for real-world use. These are the most complex, integrating working electronics, sensors, or mechanisms and are used for rigorous testing and final product validation.
The more complex and detailed the prototype, the higher the cost involved.
Unit 20 The Courtyard, Maisies Way The Village, South Normanton, Derbyshire, DE55 2DS
View on Google Maps